 Submitted by M. R. Hamilton on
Our email client of choice at aFreeCountry.com is Thunderbird by Mozilla. It is a very good email client that is extremely configurable, easy to use and most importantly, it's free. Of course, for many the most important attirbute to a softwate program for checking email is security and privacy, especially since Edward Snowden exposed the federal government's intrusion into Americans privacy through the NSA. However, most email clients today support email encryption and the one you choose should be the one you are most familiar with. However, the one you are most familiar with should support email encryption.
One of the addons you can use to expand Thunderbird is Enigmail. Enigmail is a "Simple interface for OpenPGP email security". The easiet way to add it to Thunderbird is to go to your "Tools ->Addons" menu. This will bring up another tab in Tunderbird showing your addons.
Do a search for Enigmail in the search box in the top right of the page. When Enigmail is found, one of the buttons dislpayed to the right is an option to "Install" Enigmail. After Enigmail is installed restart Thunderbird.
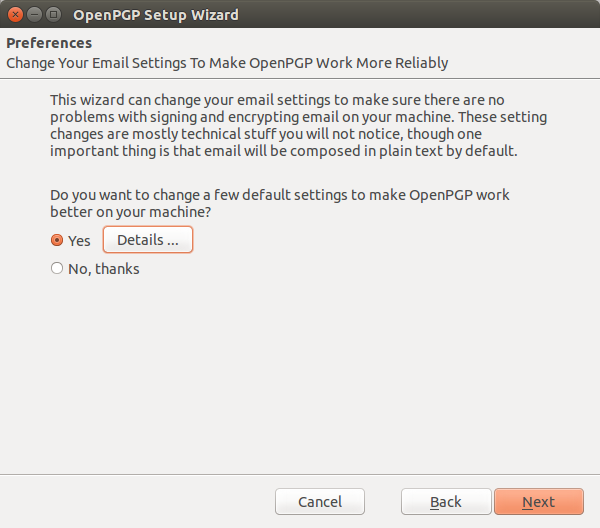
You will now see an OpenPGP menu. Clicking on the menu will bring up the menu where you will scroll down to the Setup Wizard near the bottom of the menu. This will bring up the wizard. Here you select to have the wizard get you started. Assure that the "Yes" radio button is selected and click "Next". 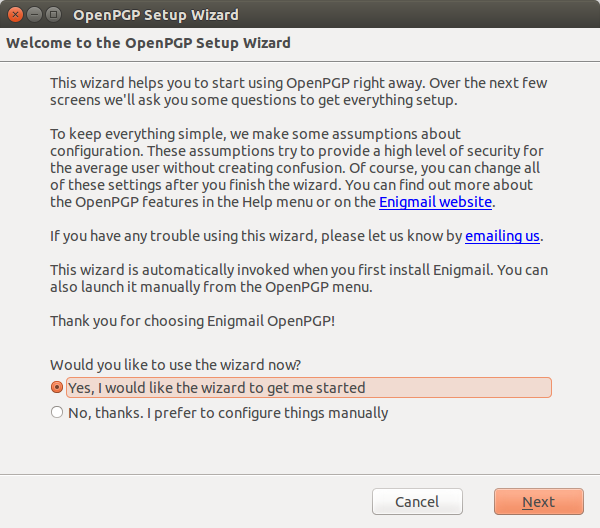
On the next screen you can decide if you want the wizard to perform the setup for all of your email addresses or not. If that is the case, you would leave the default "Yes" radio button selected and cllick the "Next" button. Of course, if you have but one email address, you can leave the "Yes" radio button selected and proceed to the "Next" screen.
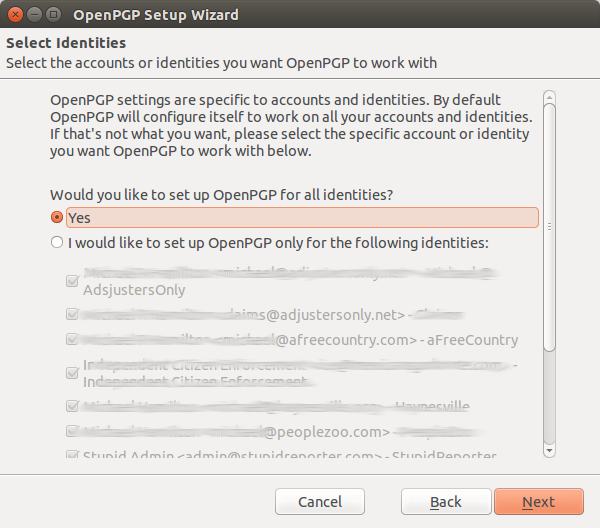
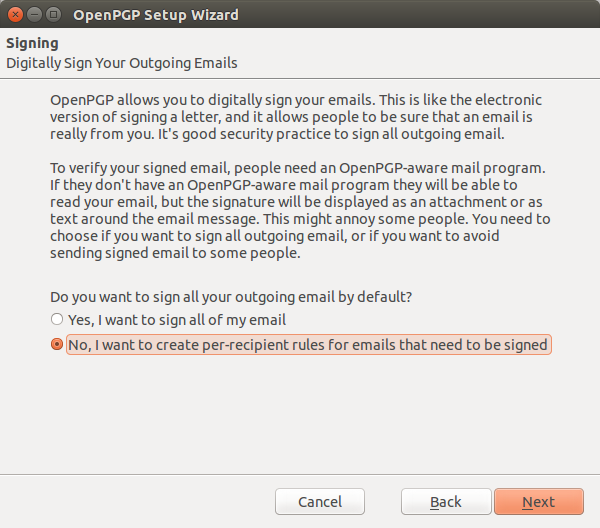
Of course, if you have more than one email address, this would require that you get everyone with whom you communicate to participate in email encryption. Most people are not that smart, so you will want to be selective with this step. In our case, you will select "No" then de-select the email addresses you do not want to setup for encryption and leave the others selected provided you have more than one email address. Then click the "Next" button which brings us to the next screen. Here you will decide whether or not you want to digitally sign all of your email. It is okay to select this option, since those who do not have your public key can see the email between the messages that show the start and end of the PGP signed message. If you woould rather set a per recipient rule, that is OK as well.
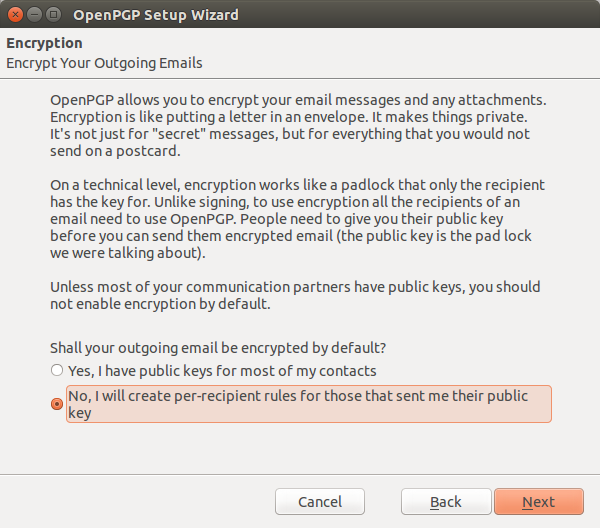
The next screen we see allows us to select whether or not we want to encrypt all of our messages or setup per recipient rules. Naturally, we want to get everyone to encrypt his email, but it may take some persuasion, to accomplish this insurmountable task. The fact is, many people beieve that since they are not "doing anything wrong" they have no reason to encrypt. This should be read as "dont' comprehend how to do it." Since once it is setup, writing and reading email is the saem as it was before the email encyrtion was setup, ecept you can no longer write fancy html to make it look as pretty. But secure and private should always take precidence over easy and pretty.
When you arrive at the screen where you select to encrypt all of your email or to do it on a selective basis, select "per Recipient rules.
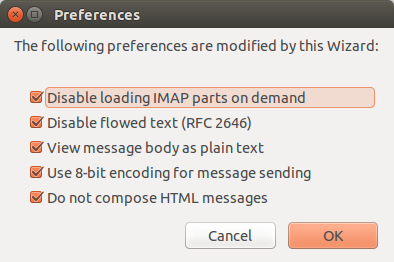
The next screen ask if you want the wizard to change your email settings.
Of course it is always a good idea to know what it is you are permitting software to change. The default setting are the most secure, so you can choose to use tham or de-select any options that you do not want changed by the wizard. It is recommended to leave the default check boxes selected for the best seucrity.
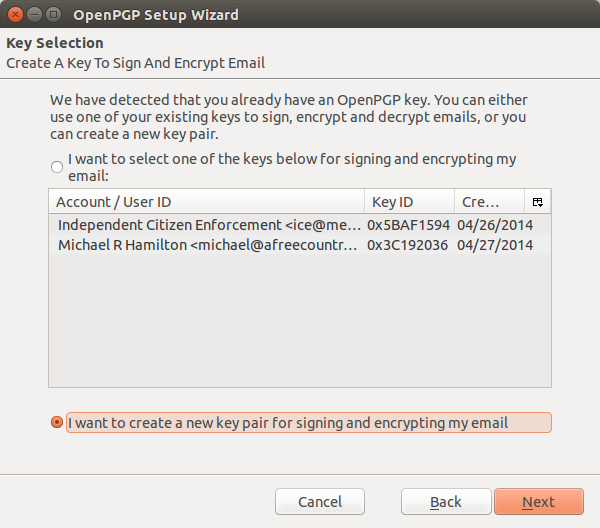
When you move to the next screen and you have already setup an encryption key, you will be presented with the following screen. If you are setting up a new key, you will select the "No" radio button or you can selct the "yes" if you want to use a key you have previously setup.
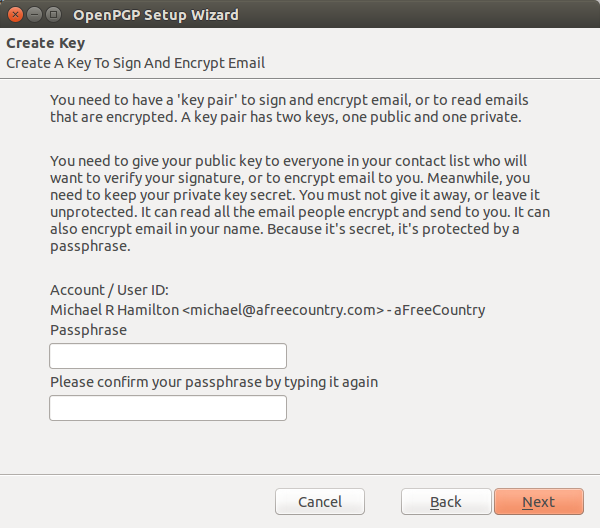
Of course, if you have not previously setup an encryption key, you will not see the previous screen. You will then be presented with a screen to setup your passphrases. Your passphrase is not something that you will have to type in each time, but it is something that you will have to know to change your ecnryption key or to sign keys from others. It should be a phrase not just a password, thus the name passphrase. It can include spaces, numerals or letters. It must have a numeral or letter in for the first character though.
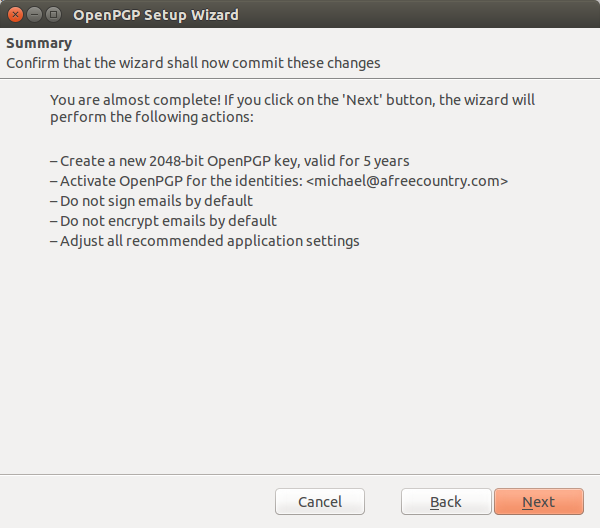
Once you have typed in and confirmed your passphrase, click the next button to proceed. The last screen just reviews what is about to happen when you proceed.
Once you have completed all of the steps and you click next to proceed, your new encryption key set will be generated. The key set is made up of two separate parts, your private or secret key and your public key. It is urgently important that you protect your secret key. Some people put this on an encrypted flash drive and remove it from the computer all together. Natually, it would not be removed from the programs that use them.
The public key is what you share with others who want to send you encrypted email. It can be uploaded to a key server or tranfered to others by flash drive like any other file and imported into their email clients for use.
The private or secrete key is used by you to decrypt the encrypted messages sent to you. Next we will review key management and what to do when you get a public key from others.
- M. R. Hamilton's blog
- Log in or register to post comments